The Loopler Gate Tier List
Thirty gates, limited slots, and a combo order. Boost first for speed; score gates want to be hit, not placed first.
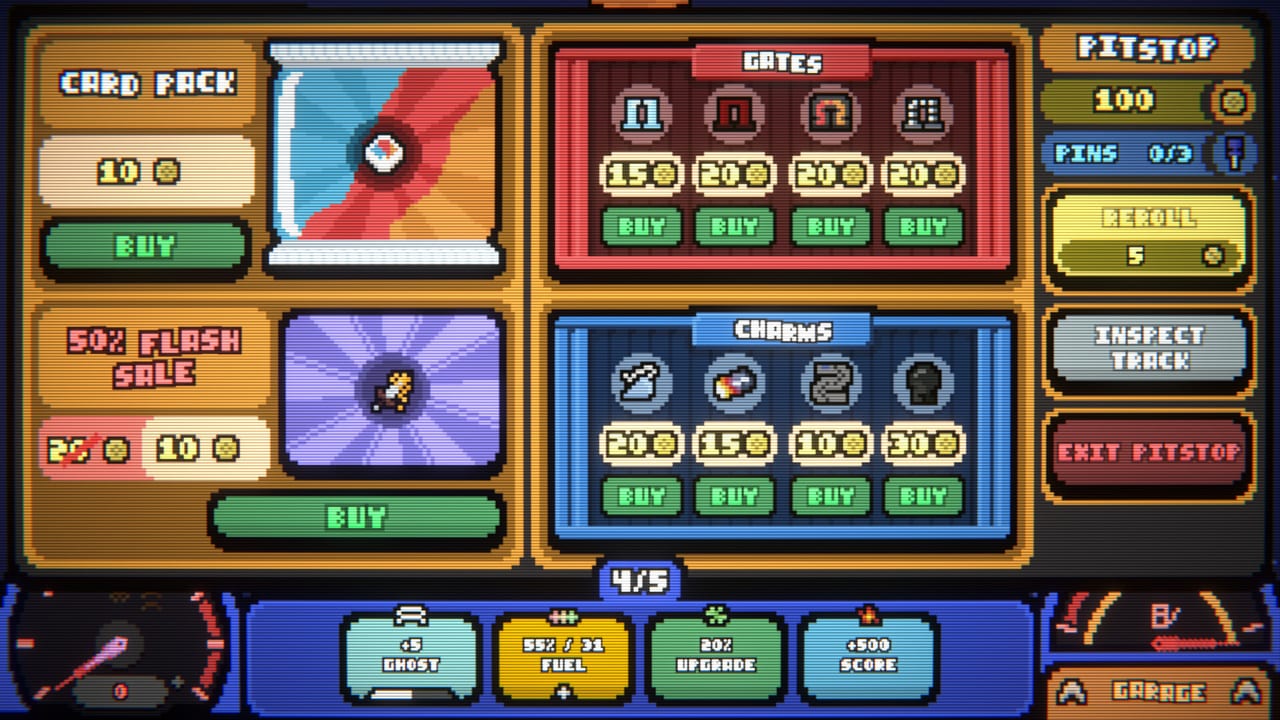
1.0 has thirty gates. You will never place thirty. Each track ships a handful of slots — demo figure-eights often showed six — and the order of those slots is a combo, not decoration. This list ranks archetypes and the sentences they form. It does not invent a fake thirty-name catalog. If a pit-stop gate is unnamed here, read the trigger (on pass, on loop, on fuel, on luck roll) and put it in the family below. Live tooltip plus Inspect Track beat any letter on this page. Pair the row with the card list so the tray and the tarmac say the same thing.
S/A/B/C is this patch’s pick priority inside a plan. A Boost gate is S in a speed build and C in a score build that needs every slot to pay points. A Score gate is the reverse. Mixing one of each “just in case” is how you fill six slots with six half-engines. Buy the first gate that matches the plan, then refuse the rest until you have gold to upgrade the ones you planted.
Why order beats rarity
The car drives itself. It hits slot one, then two, then three, every loop. Effects that need speed before the rest of the eight should sit in slot one. Effects that pay on pass and then grow want to be hit as often as possible, which usually means later slots or a tight cluster the car cannot miss. Inspect Track exists so you can see that sentence before you spend 15–20 gold.
A typical speed sentence is Boost → Gold or Fuel → whatever is left. A typical score sentence is Fuel or Lucky → Score → Score. A typical ghost sentence is Ghost → the pass you want copied → a Lucky or Chain that the copies will also hit. If you plant Score first on a speed run, you spend the fastest part of the lap paying a small number, then finally get the boost after the corner you needed it for. That is a C-tier row even with S-tier names.
Upgrade order follows the same logic. Lucky gates double their value each upgrade — that is a confirmed 1.0-era change — so a Lucky in a used slot is an A upgrade target and a Lucky in an unused slot is a waste. Chain gates exist to fire the next piece; they are S when they sit in front of a gate you already trust, and C when they point at empty tarmac.
Archetype ranks
Boost — S for speed, C for score-spam. Place first. Boost is how the car gets around the eight faster, which is the actual lowest-loops win condition. A later Boost still helps, but the first slot is the one that pays. Do not put Boost last “so it stacks more” unless the live tooltip explicitly scales on other gates you already hit.
Score — S for score engines, B as a single support on mixed tracks, C on pure speed. On passing, a typical Score gate pays half the base loop score (often 50 on the opening eight) and then increases that payout. That growth is why score-spam works: every pass is a better pass. Plant more than one only if you are actually in a score build. One lonely Score in a boost-first row is a B at best.
Gold — A support, never a finish. Golden-passing gates print shop fuel. They are A behind a Boost on a twelve-round track you will shop, and C on a two-loop speed board. They combo with Golden Lap and Golden Drift on the card list, not with Loopler.
Refuel / Fuel — S when the tank is the fail state, A as one support in every long run, C as a second fuel gate on a solved tank. Fuel gates refill on pass or on fueling, depending on the tooltip. Oil Leak events and Crown-style layouts that starve the gauge bump this to S. Two fuel gates and no engine is still a dead run.
Ghost — S for ghost engines, C until you have a pass worth copying. Extra cars only matter if they hit something. Plant Ghost next to Score, Lucky, or Chain, not next to empty slots. Duration charms on the charm list then become A; without a ghost gate they are stickers.
Lucky — A in any engine that already has Lucky Chance, B if your lucky stat is still zero, S only when you are upgrading it. Confirmed behavior: the Lucky gate doubles its value each upgrade. That compounding is the whole point. A rank-1 Lucky with no clover-style charm is a coin flip; a rank-3 Lucky with chance on the tray is an engine. Do not confuse Lucky gates with Lucky Strike the card — Strike buffs a random gate on loop; the Lucky gate is the slot that rolls on pass.
Chain — S as glue, C as a first purchase. Chain exists to trigger the next gate or to copy a pass into another effect. Place it immediately before the gate you want to fire twice. Buying Chain with two empty slots left is how players brick a row.
Boost-first versus score-spam
Boost-first is the speed script. Slot one is Boost. Slot two is Fuel or Gold depending on whether the tank or the shop is scarier this round. Remaining slots are a second Boost, a Lucky you will actually upgrade, or empty. Empty is legal. A blank slot is better than a Score gate that steals the sentence. This is the row that races lowest-loops boards and feeds Turbo Fangs.
Score-spam is the opposite script. You want the car to stay on the eight and hit paying gates as often as possible. Fuel or Lucky in an early slot keeps the run alive; Score fills the rest. Boost is the C pick here because finishing in fewer loops fights Loopler and on-pass growth. Ghost-spam is a cousin: replace some Score slots with Ghost so copies hit the paying gate. See the ghost build for the card side of that cousin.
Slot budgets are track-specific. A six-slot figure-eight can afford one support archetype. A tighter layout may only afford the engine. If the New Run carousel shows a track with fewer pins, cut Gold first, then Lucky, then the second copy of your engine. Never cut the first Boost on a speed track or the first Score on a score track.
Common mistakes: planting gates in the order the pit stop listed them; upgrading a Lucky you never hit; buying Chain as a “synergy” with nothing behind it; filling every slot because empty felt wrong. Use Inspect Track. Use skip. The synergy planner is a shop order, not a requirement to own one of each family. For the first hour of placement discipline, Getting Started and the walkthrough are stricter teachers than a letter grade. When the row is correct and the goal still outruns you, the problem is the card tray or the car, not a missing seventh gate.
Frequently Asked Questions
Quick answers to the most common questions.
Should Boost gates always go in slot one?
On a speed build, yes. On a score build, Boost is often a skip so Score and Fuel can occupy the slots. Order is a combo, not a fashion choice.
How many gates can I place?
As many slots as the track gives you — often around six on the opening figure-eights, not all 30 gates. Empty slots are legal. Inspect Track before you spend.
Why did my Lucky gate feel useless?
Is a Gold gate a win condition?
No. Gold gates buy the next pack. They are A support on a twelve-round shop plan and C on a lowest-loops board. Put them behind Boost, not in front of it.
When do I plant a Ghost gate?
After you have a pass worth copying — usually Score, Lucky, or Chain. Ghost first with empty tarmac is a C. See the ghost build for the card half of that plan.