The Loopler Car Tier List
Identity first, paint last. Rank a body by the bonus it prints and the garage radar it actually fills.
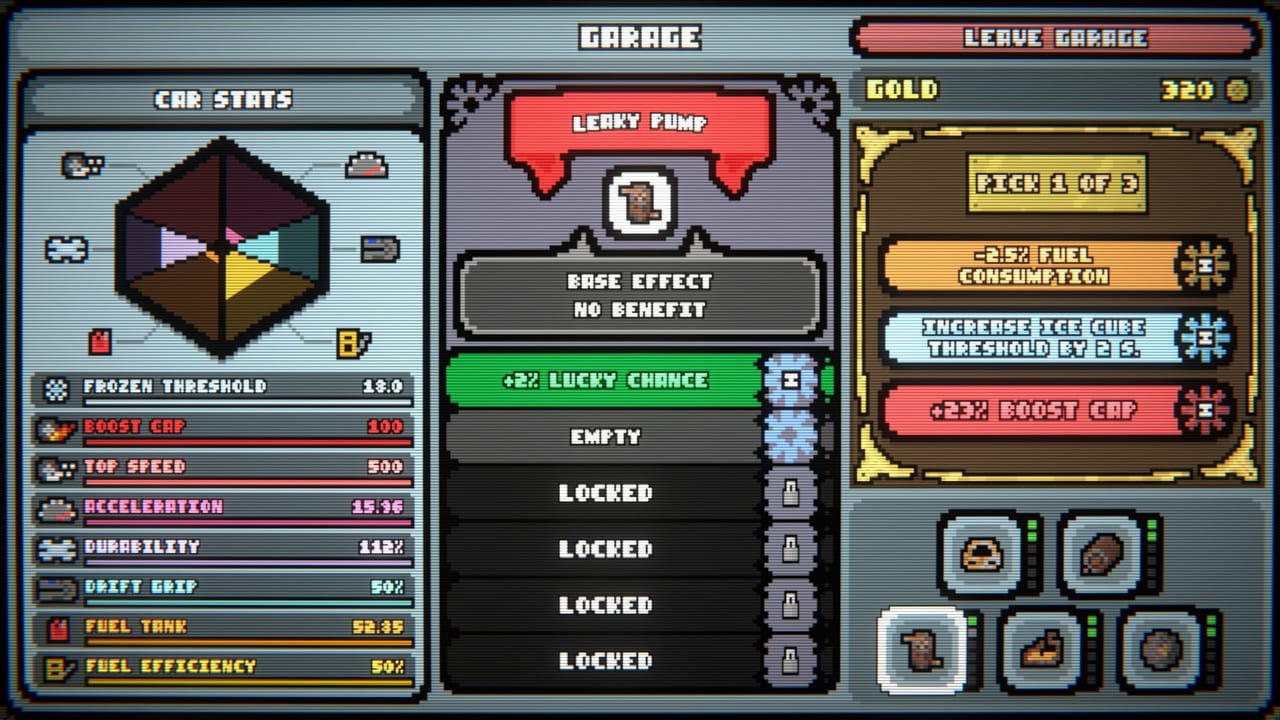
1.0 ships nine cars, each with its own identity and effects. This page names what is public and shows how to rank the rest from the garage radar. It does not invent a fake nine-name table. A car is not a skin. The identity bonus fires every round; garage parts then bend Frozen Threshold, Boost Cap, Top Speed, Acceleration, Durability, Drift Grip, Fuel Tank, and Fuel Efficiency. If those two layers disagree with a letter on this page, the live car screen wins. Pair the body with Loadout and meta before you blame the pit stop.
Letters are this patch’s pick priority, not a forever garage. S means the identity talks to the engine you plan to play. A means a solid default when you do not yet know the track. B means the body is a specialist — take it when a track or a challenge asks. C means the identity fights the plan (a gold converter on a run that never shops, a durability specialist on a lowest-loops board you will finish in two laps). Unlock order is not a tier list. The first car you can click is A for learning and C for a leaderboard you already understand.
What a car identity actually does
The identity is the sentence under the name. It is not the paint, and it is not the radar until parts are installed. Confirmed identities from public builds:
Yellow-style gold converter — A for shop-heavy plans, S if you are forcing economy. On round complete it prints gold from durability (durability divided by ten, rounding up in later builds). That is a support engine. It feeds Golden Lap and Golden Drift instead of replacing them. Take yellow-style when you want extra pit-stop pins on a twelve-round track. Skip it when you are racing a lowest-loops board and will not visit the shop enough for the gold to matter. The converter does not repair you; it spends the fact that you survived.
Blue-style extra durability — A for first hours and messy drafts, S on long Infinity Mode contracts. Public builds give this body about +10% extra durability, which is why repair rewards can push the bar past 100. It is the forgive-me car. It does not make boost gates better. It buys time to find Efficiency, Reserve Tank, or a fuel gate before the percentage in the corner hits zero. On a clean speed build that never takes damage, the extra bar is only a B.
Muscler — B specialist, C if you expected jam-era power to still be a free win. Muscler is a named body from the GMTK jam era. Players spent whole sessions trying to make it a contender. Treat it as a distinct identity, not as “the strong one.” Read the live bonus. If 1.0 still leans into a hard, peaky stat (grip, top speed, or a low fuel tank), it is B for the engine that uses that stat and C for everything else. Do not copy a jam ranking into Steam 1.0 without looking at the radar.
The other six cars exist. Rank them with the same test: what does the identity print, and which radar spoke does it raise before parts? A ghost identity is S into a ghost build and C into a boost-first speed row. A fuel-tank identity is S on Crown-style layouts that starve the gauge and C on a short oval you finish before the tank matters.
How to rank the rest from the garage radar
Open the Garage. The left panel is a radar of eight spokes. Those spokes are the real car-to-car comparison once identities are close:
- Boost Cap — S for speed. Caps how much boost you can store. Turbo Fangs and boost-on-start cards care about this number more than Top Speed does.
- Fuel Tank and Fuel Efficiency — S for any run that lasts more than a handful of loops. Reserve Tank ignores efficiency; everything else does not. Oil Leak events punish this pair specifically.
- Top Speed and Acceleration — A for speed boards, B for score boards that want more passes rather than a higher cap. Frozen Threshold sits next to them: it is the floor the car refuses to drop below, which matters when you empty the tank and start coasting.
- Drift Grip — S on Hotdog-style curves if you drafted Golden Drift or other on-drift cards. C on layouts that never slide.
- Durability — A insurance. S only when the identity or a challenge is eating the bar (skull lanes, long Infinity Mode, a car that converts durability into gold).
Parts in the center column can roll tiny bonuses even when the part name looks like junk. A Leaky Pump with no base benefit can still show +2% Lucky Chance or a Boost Cap bump. That is why two players with the same named car are not in the same tier. Spend meta gold on one part per session; details sit in Loadout and meta. Do not wait for a “perfect” car. The New Run carousel will keep locked bodies until you finish tracks and climb the unlock spine. Play the A body you have.
Matching cars to engines
Speed. You want Boost Cap, Fuel Tank, and a Frozen Threshold that does not collapse when the gauge hits zero. Yellow-style gold is optional; you will not shop enough on a two-loop win for the converter to be S. Blue-style durability is B. Muscler is B only if its live identity is actually a speed sentence. Draft Efficiency, Reserve Tank, and Turbo Fangs. Plant boost gates first.
Ghosts. Identity that spawns, lengthens, or copies passes is S. Radar stats matter less than having ghost gates to hit. Durability is A because ghost runs stay on the track longer. Drift Grip is B unless the copies also drift.
Score. Identity that raises on-loop or on-pass value is S. Top Speed is often a C — you want more loops for Loopler, not fewer. Fuel Tank is still A; score engines die to empty tanks just like everyone else. Yellow-style gold is A because score rows eat shop ranks.
Challenges and dailies. Read the modifier before the car. Pacifier-style goal cuts make a slow identity playable. Skull-style goal hikes demand a speed body or a score identity that is already ahead of the curve. See challenges and the charm list before you lock the carousel.
Cars do not replace gates. A yellow converter with no gold gate is a slower blue car. A high Boost Cap with score gates in slot one is a confused speed run. Pick the body, then write the same sentence on the tarmac. For a first-hour route that does not stall on locked cars, use Getting Started. For endless contracts, take the durability identity into How to Go Infinite and stop swapping bodies mid-session just because a new silhouette unlocked.
Frequently Asked Questions
Quick answers to the most common questions.
How many cars are in The Loopler?
Nine in 1.0, each with an identity effect. This page names the confirmed ones and ranks the rest from the garage radar. See Loadout and meta for parts.
Is the yellow car always better because it makes gold?
No. Yellow-style gold is A for shop-heavy twelve-round tracks and a skip on lowest-loops speed boards. Gold is support, not a finish condition.
Should I wait to unlock every car before ranking them?
No. Play the A body you have. Judge locked cars from Frozen Threshold, Boost Cap, Fuel Tank, and the live identity the first time they appear on the carousel.
Does Muscler still play like the jam version?
Do not assume that. Muscler is a named jam-era body. Read the 1.0 tooltip and radar; jam memories are not a tier list. Compare it to the engine on the card list.
Which garage stat should I raise first?
Boost Cap and Fuel Tank for speed, Durability for Infinity Mode, Drift Grip only if you drafted on-drift cards. Full part order is on Loadout and meta.