The Loopler Loadout and Meta Progression
Spend unlocks on the engine you actually run, roll garage parts on purpose, and stop enabling every card you own.
The Loopler’s between-runs layer is a garage, an unlocks tree, and a loadout that decides which cards and gates are even allowed to show up. None of that steers the car. All of it decides whether the next pit stop can build a speed, ghost, or score engine instead of a junk drawer. This page is the 1.0 meta route: what the radar stats mean, how parts roll, what loadout is for, and what to unlock while you are still in the twenties.
Demo progress does not carry into the full game. Mheep said the demo and playtest reset for 1.0. Treat anything you unlocked on the Next Fest slice as practice. The demo’s meta cap sat around level 10, loadout showed up around meta 5, and a chain gate around 6. 1.0 expanded the tree, the part system, and the loadout so those early breakpoints are history, not a checklist. You will still see useful cards and gates arriving in the twenties. Do not wait for a maxed tree to play; do spend something after every session.
Garage radar and car parts
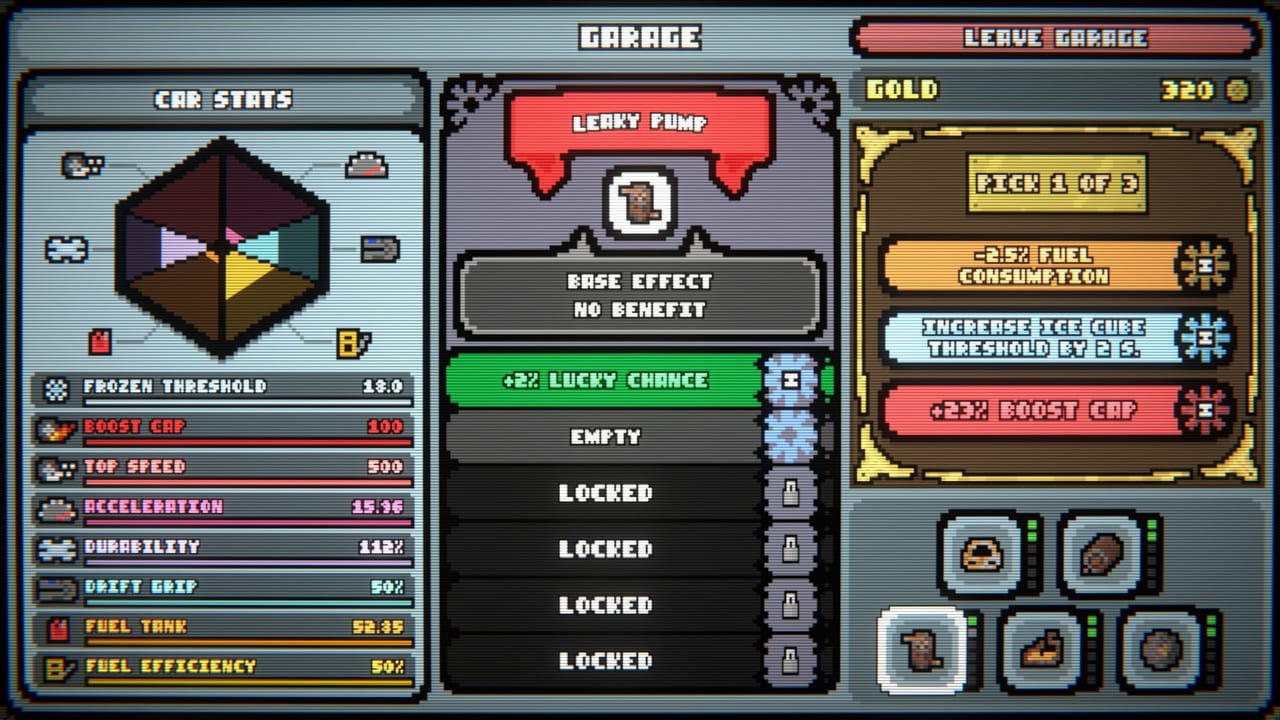
Open Garage from the lobby or the HUD button. The left panel is a radar of eight stats: Frozen Threshold, Boost Cap, Top Speed, Acceleration, Durability, Drift Grip, Fuel Tank, and Fuel Efficiency. Those are not flavor. Boost Cap and Top Speed are the speed build knobs. Durability and Fuel Tank are how you stop dying to the two fail states (broken durability, empty fuel). Drift Grip feeds on-drift cards such as Golden Drift. Frozen Threshold is the ice-cube line; parts can roll an ice-cube threshold and change when the car behaves like it hit a freeze. Fuel Efficiency is how scared you should be of Oil Leak.
The center column is car parts. They are not a linear shop of “buy engine block 3.” A part like Leaky Pump can have no base benefit and still roll a handful of modifiers: +2% lucky chance, −2.5% fuel consumption, +23% boost cap, an ice-cube threshold. Those example rolls are the point. You are fishing for the modifier that matches the engine, not for a pretty name. Rerolling parts is a meta gold sink. Roll toward:
- Speed lines: Boost Cap, Top Speed, Acceleration, Fuel Efficiency.
- Ghost lines: Durability, Drift Grip, Fuel Tank, lucky chance once ghost gates exist.
- Score lines: lucky chance (Lucky Strike, lucky gates), Fuel Efficiency, Durability so you live through the upgrade window.
Do not rainbow-roll. A part that adds a little of everything is how mixed kits happen before the run even starts. Yellow-style cars that pay gold equal to durability/10 on round complete like Durability for two reasons: they live, and they print shop money. Blue-style extra starting durability is a first-hour cushion. Identities: car tier list.
Unlocks tree and loadout
The Unlocks spine is a meta tree paid with the currency you earn by looping. Levels in the 20s are still granting cards, gates, and dice-like modifiers. That is normal. You are not behind because you have not finished the tree after a weekend. Spend on the next piece of the engine you already like, not on a random shiny from a family you never draft.
Priority while the tree is young:
- Anything that adds a card slot. More held cards means the pit pack can actually complete a sentence. Demo players called extra card slots game-changing because they were.
- Loadout itself, then the gates and cards that fill it. Loadout is an enable list. Unlocked does not mean “will appear.” Enabled means “may appear.” Disable the families you do not run. A speed attempt should not be able to roll a museum of on-pass score cards just because you unlocked them.
- One gate archetype you are missing. Boost if you have no speed line. Ghost if you have never seen a swarm. Score if you want the deckbuilder. Chain as a combo finisher once you already have a sentence to finish. Lucky gates (value doubles on upgrade) are a 1.0 shop fact worth unlocking early.
- Charms that stack with that archetype. Coupon is multiplicative. “Gates 10% chance to trigger twice” is universal glue. Skip Skull unless you like meaner goals. Pacifier is a training-wheel charm and a challenge tool. Rankings: charm tier list, gate tier list, card tier list.
Loadout is also how 1.0 answers demo RNG complaints. Shop droughts felt terrible when the pool was small and you could not veto junk. Enabling a tight pool is the veto. If you own fifty cards and enable all fifty, you rebuilt the drought. Enable the on-loop speed family or the on-pass score family or the ghost spawn family, plus a fuel support and a gold support. That is a loadout. That is not “I collected them so they deserve playing time.”
Five difficulties and nine tracks sit behind the same meta layer. You do not need every layout unlocked to start using loadout. Infinity (“a loop that never quite ends”), Hotdog, and Crown (“fit for a monarch”) already teach slot counts. Harder difficulties are for after the enable list is tight. Track notes: tracks page. Infinity Mode is a separate contract; the garage still applies. See How to Go Infinite.
Daily, weekly, and the five unique challenges can ignore or override parts of your usual loadout. That is the point of a challenge. Do not rebuild the entire tree for a daily; enable the family the modifier wants, play the run, put your main enable list back. Challenge routing: Challenges.
Forty-seven Steam achievements track a lot of this layer: clears, boards, maybe the ugly cars you have been avoiding. Play for the engine, then mop achievements. Do not unlock a bad family “for the badge” and leave it enabled.
Between sessions, one useful loop is: finish a 12-round clear (see the walkthrough), spend unlocks on one slot or one gate, roll one part toward the radar hole you actually felt, then disable two cards that stole a pack. HUD reminders live in How to Play. The synergy planner is a checklist you can keep next to the garage so the next pit stop is not a surprise.
Frequently Asked Questions
Quick answers to the most common questions.
Does demo meta progress carry into 1.0?
No. Mheep reset demo and playtest progress for launch. Start the tree on Steam 1.0 and follow the launch notes.
What should I unlock first?
Why does a Leaky Pump with no base benefit matter?
Parts roll modifiers. +23% boost cap or −2.5% fuel consumption on a "blank" part is a real garage upgrade. Match the roll to the engine, not the name.
Should I enable every unlocked card?
No. Loadout is a veto. Enabling all fifty cards rebuilds shop droughts. Keep one family plus fuel and gold support.