The Loopler A 12-Round Walkthrough
Route the node map, spend gold on purpose, and finish the contract before the goal outruns you.
A standard Loopler track is twelve rounds. The HUD counts 1/12 to 12/12. This walkthrough is a route, not a scripted seed: the branching node map, event rolls, and pit-stop stock will never match a video frame-for-frame. The embedded Sifd clear is an 18-minute demo-era win. Treat it as shop discipline and pacing, then ignore its exact gold totals, card ranks, and loop counts when they disagree with Steam 1.0 tooltips.
Pick the layout before you worry about a god pack. Infinity is “a loop that never quite ends.” Hotdog is the other early eight. Crown is “fit for a monarch” and asks you to count gate slots more carefully. Rankings live on the tracks page. Stay on an easier difficulty until you can finish twelve rounds without panic-rerolling. Car identity is a bonus, not a walkthrough: yellow-style gold equal to durability/10 on round complete helps shop-heavy lines; blue-style extra starting durability forgives messy fuel. Identities are ranked on the car tier list.
Rounds 1–4: plant the engine
Round 1 often opens at a 200-point goal. You will beat it with almost any kit. That is the trap. Demo feedback called the first round “the same race every time,” and Mheep reworked that sameness for 1.0. Still: do not treat a free win as a free shop. After the lap, prefer a pit-stop node over a pure gold node if the map offers both. You need one gate that matches the plan before the goal starts doubling in spirit.
Spend the first pit in this order:
- A boost gate if you are heading toward a speed build. A score gate if you are heading toward a score build. A ghost gate if the ghost build is the point. Do not buy one of each.
- A card pack around 10 gold only if the engine is missing a trigger — no on-loop fuel, no on-loop gold, no ghost spawn.
- Skip charms that do nothing until you have gates. Coupon later becomes multiplicative; it is still a multiplier of nothing on round 1.
Reward picks after a lap are usually gold, a durability bump, or a pack. Take durability if you are already below a comfortable percentage. Take gold if the next node is a shop and you are 10–20 short of a gate. Take a pack only when the current cards do not talk to the gates you placed. Named early cards include Loopler (score total loops multiplied when looping), Lucky Strike (10% on loop to buff a random gate +50% next trigger), and Golden Drift (+1 gold every 40 drift ticks, max 10 per repair). They are examples of on-loop, luck-on-loop, and on-drift families, not a shopping list. See the card tier list.
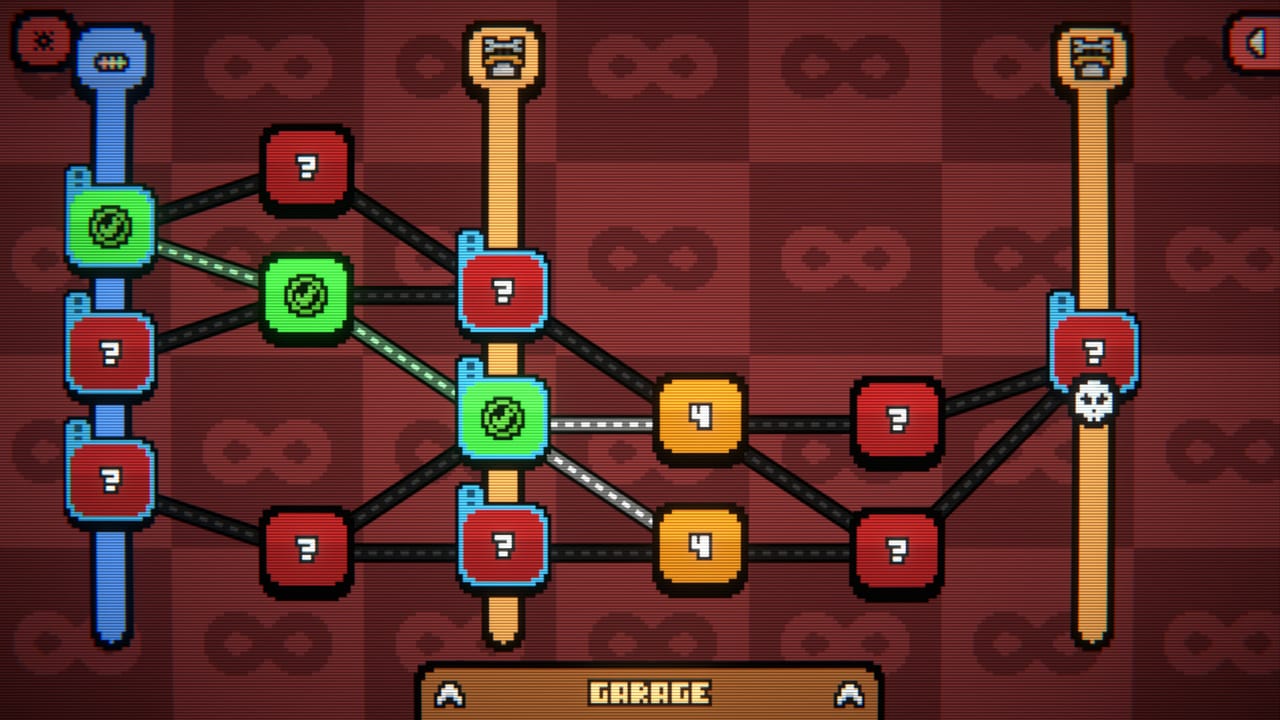
Round-select is a branching node map, not a playlist. Blue, orange, and skull-marked columns are risk lanes. Early on, prefer blue unless you specifically want event chaos. Question-mark nodes hide events. Oil Leak is the confirmed nasty one: refuel efficiency losses jump dramatically. If your kit is a refuel engine, skip Oil Leak even if the gold looks generous. If you are a speed line that barely uses refuel, the event is cheaper than it looks.
Rounds 5–8: the goal gets rude
By round 6 the contract can already be five figures. This is where mixed engines die. If the bottom kit tiles show a little Ghost, a little Score, and a little Boost, you will fill the bar on round 5 and starve on round 7. Rebuild in the pit: sell or ignore the off-plan cards, place the next gate in combo order, and accept that gold is support.
Shop timing rules for the middle:
- Enter a pit when you have a hole (no fuel plan, empty gate slots, zero charms that stack). Do not enter every pit just because the node is there.
- Skip a pack when the three faces are all the wrong family. Skip can cost 100. Paying 100 to refuse garbage is correct if the alternative is a dead on-pass score card in a speed run.
- Reroll around 5 gold is cheap until Trade Requisition is in play (demo daily/weekly exclusive: +1 reroll, reroll cost 5x). If 1.0 still sells that idea, treat rerolls as a budget, not a fidget.
- Inspect Track before you drop the second and third gates. Slot order is a combo. Boost first for speed. Score wants to be hit often, not first. Ghost gates want duration uptime. Rankings: gate tier list.
Skull lanes in this window are optional spice. They pay more and break more. Take a skull if durability is healthy and you already have a fuel plan. Do not take a skull to “make the walkthrough interesting” while sitting on 20% durability. Flash-sale rows can be traps; a cheap charm that does not stack with your kit is still expensive.
Speed-up is allowed once the engine is named. 2x is for this block. 4x is for rounds 10–12 when you already know the fail state. Pause if an event tooltip is new. 1.0 actually pauses the simulation.
Rounds 9–12: close the contract
Late goals climb faster than your feelings. The win condition is still the bar, not a high score. If you are on a lowest-loops board, extra loops are a loss. If you are on a normal clear, extra loops are just fuel burned. Either way, stop buying “maybe later” cards.
Round 9–10 pits should only buy upgrades to the engine you already have: another boost slot, another ghost duration, another on-pass score tick, or a charm that multiplies that engine. Lucky gates double value on upgrade — that is a real late spend. Chain gates exist as an archetype for combo finishers; they are wasted if you still have empty slots of the wrong type.
Round 11–12 is where overdrive shows up if you have been sloppy with durability. Overdrive is a last sprint after the percentage hits zero, not a strategy. Plan as if it will not save you. Take the durability reward over gold if the bar is yellow. Skip event nodes that tax fuel. Exit the last pit with gold in pocket; leftover gold is a trophy, not a failure.
After 12/12, a normal track ends. Infinity Mode is a different contract; route that in How to Go Infinite. Daily and weekly modifiers belong in Challenges. Garage parts and loadout slots that make this walkthrough repeatable sit in Loadout and meta.
A clean walkthrough run is boring on purpose: one engine, two or three matching gates, a fuel or gold support card, and the will to skip. Sifd’s 18-minute demo clear looks fast because the shop was disciplined, not because the car was steered. Do not copy the exact pack order. Copy the habit of leaving the pit.
Frequently Asked Questions
Quick answers to the most common questions.
How many rounds is a normal The Loopler run?
The HUD uses a 12-round contract on the figure-eight layouts. Infinity Mode continues past that. See How to Go Infinite.
When should I skip a card pack?
When none of the faces match your engine. Skip can cost 100. Paying to refuse a dead pack is correct. Shop language is in How to Play.
What does the Oil Leak event do?
Refuel efficiency losses increase dramatically. Avoid it if your kit is a refuel engine. Event routing is part of this walkthrough; charm answers sit on the charm tier list.
Is Sifd's 18-minute video a 1.0 route?
No. It is demo-era. Gold totals, card ranks, and loop counts may differ. Use it for pacing, then follow 1.0 tooltips and the launch notes.